What Sits Behind the Tile: How a Walk-In Shower Is Waterproofed
The part of a shower that keeps water out is the part nobody sees once the job is done.
October 6, 2026 · 3 min read
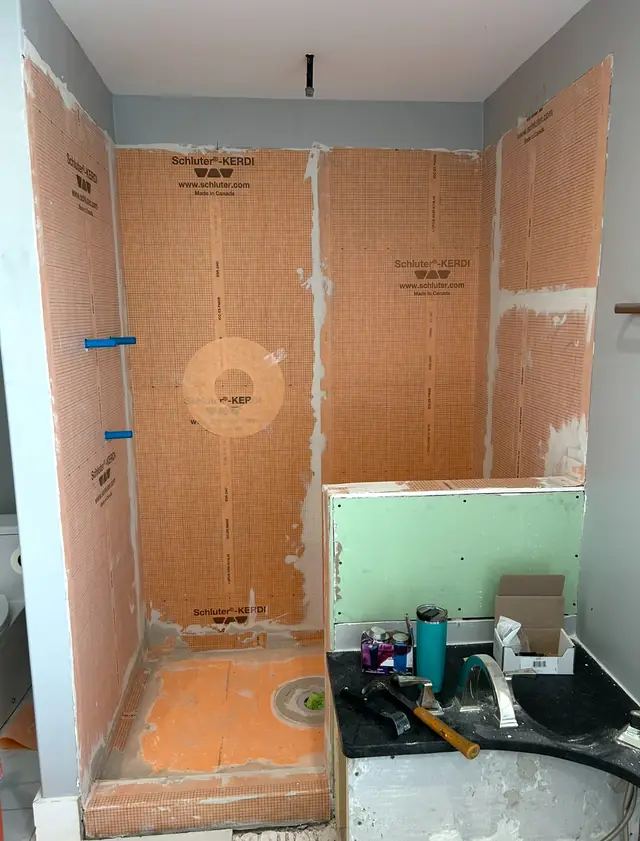
A finished walk-in shower looks like stone, glass and clean lines. What keeps it from rotting your bathroom wall in five years is nothing you can see. It's a set of layers behind the tile, installed in a specific order, and most of the quality of the job is in those layers.
Why tile alone doesn't keep water out
Tile itself is close to waterproof, but a shower wall is made of far more than tile. Grout is porous. Joints crack a little as a house moves through the seasons. Water finds the smallest gap, and the board behind the tile can absorb it. Once moisture sits in a wall, you get mold, softened wall board and eventually a stain on the ceiling below.
So the real waterproofing happens behind the finish. The tile and grout shed most of the water. The layer behind them handles whatever gets past.
Step one: set the plumbing before the wall closes
The shower valve and the pipes for the shower head and body sprays are set while the wall is still open. The valve has to sit at the right depth so the trim finishes flush once the tile thickness is added. Plumbing stub-outs, the short pipe ends that stick through the wall, get locked in place and capped. Doing this before the wall closes means no one is cutting through a finished wall to fix a mistake, and every hole in the wall board is placed and measured on purpose.
Step two: a flat wall and a pan that slopes
The wall board has to be flat, because a bowed wall makes the membrane and the tile fight each other. The floor has to slope toward the drain, with a gentle, even pitch so water never sits in the corners. A shower that holds a puddle is a shower that fails early.
Step three: the membrane over the wall board
Next comes the waterproof layer, either a sheet that's bonded to the wall or a liquid that's rolled or troweled on to a specified thickness. It covers the wall board from the pan up to well above the shower head, and runs across the pan itself. This membrane is the shower's actual barrier. The tile gets set on top of it.
Step four: seal every opening
Every place something passes through the membrane is a possible leak. The valve gets a sealed collar around it. The shower arm and any body spray fittings get the same treatment. A recessed niche is built as a box with its own membrane and sloped shelf, so water runs back out instead of pooling. Every one of these details is small, and every one is where a rushed job quietly goes wrong.
Step five: overlapped bands at corners and seams
Corners and seams are where a shower flexes and where leaks most often begin. A careful installer sets reinforcing bands of membrane over every inside corner, every seam between sheets and the joint where wall meets pan. The bands overlap the field of the membrane, and they're set in thinset mortar so they bond fully with no air pockets. Think of it like shingles on a roof: each layer overlaps the one below it so water is always sent downhill, never into a gap.
Step six: test it before you cover it
Before any tile goes on, many installers plug the drain, fill the pan with water and let it stand to check for drops. It's a simple test, and it's far cheaper to find a leak now than after the tile is up. When you hire for a shower, ask whether the installer tests the pan and how.
What to ask a contractor
- What waterproofing layer goes behind the tile, and how is it sealed at the valve and the niche?
- How are the corners and seams reinforced?
- Are the plumbing stub-outs set before the wall closes?
- Is the pan tested before tile goes on?
- Can I see the work at the membrane stage?
A good contractor won't mind that last question. Many will welcome it, because the membrane stage is where the craft shows.
Where JMI fits in
JMI Construction Group handles bathroom renovations, including new fixtures, tile work, vanities and custom shower installations, across Northwest Arkansas. One customer wrote that they took their design and made it real, and a 4.9 rating on Google from 66 reviews suggests that wasn't a one-off.
If you're planning a bathroom and want to see how the job is built behind the tile, see the remodeling page at /remodeling or call JMI at (479) 544-2856.
JMI Construction Group LLC, (479) 544-2856
Call (479) 544-2856More articles
What to Do in the First 48 Hours After Hail or High Wind Hits Your Roof
The first two days after a storm decide how much damage you end up paying for, and most of the work happens before anyone climbs a ladder.
Why You Should Call a Contractor Before You File a Roof Insurance Claim
The first call you make after storm damage shapes everything that follows, and it works best when you already know what you're claiming.